Appearance
Publishing Artifacts
When we use third-party open-source libraries like commons-logging, we are essentially having Maven automatically download their jar files and parse dependencies based on their pom.xml, automatically adding the relevant dependencies to the classpath.
This brings up the question: when we create our own impressive open-source library, we certainly want others to use it. However, we can't just provide a direct link to the jar file for others to download, can we?
If we publish our open-source library to a Maven repository, others can simply reference it using the standard groupId:artifactId:version, and Maven will automatically download the jar along with its dependencies. Therefore, this section introduces how to publish a library to a Maven repository.
There are several ways to publish your library to a Maven repository, and we will introduce the three most commonly used methods.
Publishing as Static Files
If we observe the Artifact structure of a Central Repository, for example, Commons Math, with groupId as org.apache.commons, artifactId as commons-math3, and version 3.6.1, the folder path in the Central Repository is https://repo1.maven.org/maven2/org/apache/commons/commons-math3/3.6.1/. In this folder, commons-math3-3.6.1.jar is the published jar file, commons-math3-3.6.1.pom is its pom.xml descriptor file, commons-math3-3.6.1-sources.jar is the source code, and commons-math3-3.6.1-javadoc.jar is the documentation. Other files ending with .asc, .md5, .sha1 are GPG signatures, MD5 checksums, and SHA-1 checksums, respectively.
As long as we organize the files following this directory structure, it constitutes a valid Maven repository.
Using the highly acclaimed open-source project how-to-become-rich as an example, first create the Maven project directory structure as follows:
how-to-become-rich
├── maven-repo        <-- Maven local file repository
├── pom.xml           <-- Project file
├── src
│   ├── main
│   │   ├── java      <-- Source code directory
│   │   └── resources <-- Resources directory
│   └── test
│       ├── java      <-- Test source code directory
│       └── resources <-- Test resources directory
└── target            <-- Build output directory
Add the following content to pom.xml:
xml
<project ...>
    ...
    <distributionManagement>
        <repository>
            <id>local-repo-release</id>
            <name>GitHub Release</name>
            <url>file://${project.basedir}/maven-repo</url>
        </repository>
    </distributionManagement>

    <build>
        <plugins>
            <plugin>
                <artifactId>maven-source-plugin</artifactId>
                <executions>
                    <execution>
                        <id>attach-sources</id>
                        <phase>package</phase>
                        <goals>
                            <goal>jar-no-fork</goal>
                        </goals>
                    </execution>
                </executions>
            </plugin>
            <plugin>
                <artifactId>maven-javadoc-plugin</artifactId>
                <executions>
                    <execution>
                        <id>attach-javadocs</id>
                        <phase>package</phase>
                        <goals>
                            <goal>jar</goal>
                        </goals>
                    </execution>
                </executions>
            </plugin>
        </plugins>
    </build>
</project>
Notice the <distributionManagement> section, which indicates the location where the package will be published. Here, the <url> points to the maven-repo directory in the project root. The two plugins defined in <build>—maven-source-plugin and maven-javadoc-plugin—are used to create the source code and Javadoc, respectively. If you do not wish to publish the source code, you can remove the corresponding plugin.
Run the Maven command mvn clean package deploy directly in the project root directory.
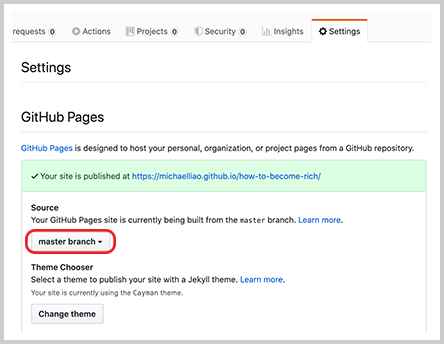
The final step is to push this project to GitHub and enable GitHub Pages by selecting Settings > GitHub Pages and choosing the master branch:

By pushing all the content to GitHub, you can access the Maven repository as a static website at https://michaelliao.github.io/how-to-become-rich/maven-repo/. The jar file for version 1.0.0 is located at:
https://michaelliao.github.io/how-to-become-rich/maven-repo/com/itranswarp/rich/how-to-become-rich/1.0.0/how-to-become-rich-1.0.0.jarNow, if others wish to use this Maven package, we can inform them to include the following dependency:
xml
<dependency>
    <groupId>com.itranswarp.rich</groupId>
    <artifactId>how-to-become-rich</artifactId>
    <version>1.0.0</version>
</dependency>
However, in addition to the normal dependency import, they also need to add a <repository> declaration. Thus, the complete pom.xml for the user should look like this:
xml
<project xmlns="http://maven.apache.org/POM/4.0.0"
    xmlns:xsi="http://www.w3.org/2001/XMLSchema-instance"
    xsi:schemaLocation="http://maven.apache.org/POM/4.0.0 http://maven.apache.org/xsd/maven-4.0.0.xsd">
    <modelVersion>4.0.0</modelVersion>

    <groupId>example</groupId>
    <artifactId>how-to-become-rich-usage</artifactId>
    <version>1.0-SNAPSHOT</version>
    <packaging>jar</packaging>

    <properties>
        <maven.compiler.source>11</maven.compiler.source>
        <maven.compiler.target>11</maven.compiler.target>
        <java.version>11</java.version>
    </properties>

    <repositories>
        <repository>
            <id>github-rich-repo</id>
            <name>The Maven Repository on Github</name>
            <url>https://michaelliao.github.io/how-to-become-rich/maven-repo/</url>
        </repository>
    </repositories>

    <dependencies>
        <dependency>
            <groupId>com.itranswarp.rich</groupId>
            <artifactId>how-to-become-rich</artifactId>
            <version>1.0.0</version>
        </dependency>
    </dependencies>
</project>
In the <repository> section, we must declare the URL of the published Maven repository. The <id> and <name> can be filled arbitrarily, and the <url> should include the GitHub Pages provided address with the /maven-repo/ suffix. Now, the library can be referenced normally, and the following code can be written:
java
Millionaire millionaire = new Millionaire();
System.out.println(millionaire.howToBecomeRich());
Some may ask why, when using third-party libraries like commons-logging, we don't need to declare the repository address. This is because these libraries are published to Maven Central Repository. Once published to the Central Repository, there is no need to specify the repository address because Maven already knows the default Central Repository URL https://repo1.maven.org/maven2/. Additionally, you can specify a proxy repository in ~/.m2/settings.xml to replace the Central Repository for faster access (refer to dependency management's Maven mirrors).
Since GitHub Pages does not synchronize our published Maven packages to the Central Repository, users must manually add the repository address we provide.
Furthermore, when publishing a Maven repository via GitHub Pages, one important point to note is not to modify any published versions. Maven repositories do not allow modifying any version once published. The only way to modify a library is to publish a new version. Although, by publishing the repository as static files, it is technically possible to modify jar files, it is best to adhere to the conventions and avoid altering already published versions.
Publishing to Central Repository via Nexus
Some may ask if it's possible to publish their open-source library to Maven Central Repository so that users do not need to declare the repository address, making it appear more professional.
Of course, it is possible. However, you cannot directly publish to Maven Central Repository. Instead, you can use an indirect method by publishing to central.sonatype.org, which regularly synchronizes with Maven Central Repository. Nexus is software that supports Maven repositories, developed by Sonatype, available in both free and professional versions. Many large companies use Nexus internally as their private Maven repository, while central.sonatype.org serves as a public Nexus service for open-source projects.
Therefore, the first step is to register an account on central.sonatype.org. If registration is successful and approved, you will receive a login account. Then, follow the steps on the website to successfully publish your Artifact to Nexus. After patiently waiting a few hours, your Artifact will appear in Maven Central Repository.
Here are some key points and challenges in publishing:
Correctly create GPG signatures: It is recommended to use
gnupg2on Linux and macOS.Configure login credentials and GPG passphrase in
~/.m2/settings.xml:xml<settings ...> ... <servers> <server> <id>ossrh</id> <username>OSSRH-USERNAME</username> <password>OSSRH-PASSWORD</password> </server> </servers> <profiles> <profile> <id>ossrh</id> <activation> <activeByDefault>true</activeByDefault> </activation> <properties> <gpg.executable>gpg2</gpg.executable> <gpg.passphrase>GPG-PASSWORD</gpg.passphrase> </properties> </profile> </profiles> </settings>Add OSS Maven repository address and plugins (
maven-jar-plugin,maven-source-plugin,maven-javadoc-plugin,maven-gpg-plugin,nexus-staging-maven-plugin) to the Artifact'spom.xml:xml<project ...> ... <distributionManagement> <snapshotRepository> <id>ossrh</id> <url>https://oss.sonatype.org/content/repositories/snapshots</url> </snapshotRepository> <repository> <id>ossrh</id> <name>Nexus Release Repository</name> <url>http://oss.sonatype.org/service/local/staging/deploy/maven2/</url> </repository> </distributionManagement> <build> <plugins> <plugin> <groupId>org.apache.maven.plugins</groupId> <artifactId>maven-jar-plugin</artifactId> <executions> <execution> <goals> <goal>jar</goal> <goal>test-jar</goal> </goals> </execution> </executions> </plugin> <plugin> <groupId>org.apache.maven.plugins</groupId> <artifactId>maven-source-plugin</artifactId> <executions> <execution> <id>attach-sources</id> <goals> <goal>jar-no-fork</goal> </goals> </execution> </executions> </plugin> <plugin> <groupId>org.apache.maven.plugins</groupId> <artifactId>maven-javadoc-plugin</artifactId> <executions> <execution> <id>attach-javadocs</id> <goals> <goal>jar</goal> </goals> <configuration> <additionalOption> <additionalOption>-Xdoclint:none</additionalOption> </additionalOption> </configuration> </execution> </executions> </plugin> <plugin> <groupId>org.apache.maven.plugins</groupId> <artifactId>maven-gpg-plugin</artifactId> <executions> <execution> <id>sign-artifacts</id> <phase>verify</phase> <goals> <goal>sign</goal> </goals> </execution> </executions> </plugin> <plugin> <groupId>org.sonatype.plugins</groupId> <artifactId>nexus-staging-maven-plugin</artifactId> <version>1.6.3</version> <extensions>true</extensions> <configuration> <serverId>ossrh</serverId> <nexusUrl>https://oss.sonatype.org/</nexusUrl> <autoReleaseAfterClose>true</autoReleaseAfterClose> </configuration> </plugin> </plugins> </build> </project>
Finally, execute the command mvn clean package deploy to publish to central.sonatype.org.
This method requires a complex account and project application process initially, and local configuration and debugging of GPG. However, once the process is successfully set up, subsequent releases only require a single command.
Publishing to a Private Repository
Using nexus-staging-maven-plugin, you can publish not only to central.sonatype.org but also to a private repository, such as a Nexus server set up internally by your company.
If you do not have a private Nexus server, you can also publish to GitHub Packages. GitHub Packages is a repository service provided by GitHub that supports Maven, NPM, Docker, and more. When using GitHub Packages, whether publishing an Artifact or referencing a published Artifact, an explicit authorization Token is required. Therefore, GitHub Packages can only be used as a private repository.
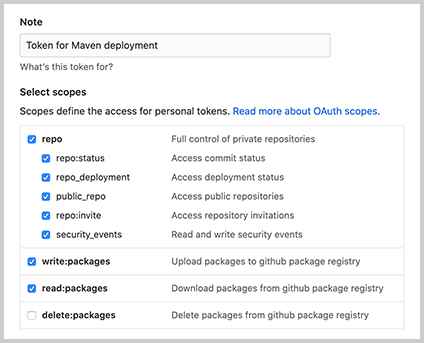
Before publishing, you must first log in and create two Tokens in the user's Settings > Developer settings > Personal access tokens: one for publishing and one for usage. The Token for publishing Artifacts must have repo, write:packages, and read:packages permissions:

The Token for using Artifacts only needs read:packages permission.
On the publishing side, add your GitHub username and publishing Token to the ~/.m2/settings.xml configuration:
xml
<settings ...>
    ...
    <servers>
        <server>
            <id>github-release</id>
            <username>GITHUB-USERNAME</username>
            <password>f052...c21f</password>
        </server>
    </servers>
</settings>
Then, in the pom.xml of the Artifact you want to publish, add a <repository> declaration:
xml
<project ...>
    ...
    <distributionManagement>
        <repository>
            <id>github-release</id>
            <name>GitHub Release</name>
            <url>https://maven.pkg.github.com/michaelliao/complex</url>
        </repository>
    </distributionManagement>
</project>
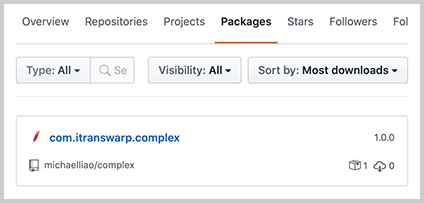
Notice that the <id> must match the <id> configured in ~/.m2/settings.xml. This is because, during publishing, Maven uses the <id> to find the corresponding username and Token for authentication to successfully upload the files to GitHub. We can deploy successfully by running the command mvn clean package deploy. After success, the Artifact can be seen on the GitHub user page:

For complete configuration, refer to the complex project, which is a very simple library supporting complex number operations.
When using this Artifact, because GitHub Packages can only be used as a private repository, in addition to declaring the <repository> in the user's pom.xml:
xml
<project ...>
    ...
    <repositories>
        <repository>
            <id>github-release</id>
            <name>GitHub Release</name>
            <url>https://maven.pkg.github.com/michaelliao/complex</url>
        </repository>
    </repositories>

    <dependencies>
        <dependency>
            <groupId>com.itranswarp</groupId>
            <artifactId>complex</artifactId>
            <version>1.0.0</version>
        </dependency>
    </dependencies>
    ...
</project>
You also need to configure a Token with read permissions in the ~/.m2/settings.xml file.
Exercise
Use the maven-deploy-plugin to publish an Artifact locally.
Summary
When publishing an Artifact with Maven:
- Publish locally: Then push to a remote Git repository, using a static server to provide a web-based repository service. Users must declare the repository address.
- Publish to
central.sonatype.org: Automatically synchronizes to Maven Central Repository. This requires initial account application and local configuration. - Publish to GitHub Packages: Use as a private repository. It requires providing Tokens with the correct permissions for both publishing and usage.